Building a Pull-Cord Chicken Coop Pop Door that Self-Locks
Keep Your Feathered Friends Safe and Sound: The Benefits of a Locking Pop Door for Your Coop
Raising chickens can be a rewarding experience. Fresh eggs, happy clucking sounds, and these feathered friends can be surprisingly entertaining to watch. But with any pet, their safety comes first. This is where a locking pop door on your chicken coop becomes a coop-tastic upgrade!
Fort Knox for Chickens: Protection from Predators
The number one reason to have a locking pop door is security. Predators like raccoons, foxes, and other nighttime nasties are always on the lookout for an easy meal. A flimsy latch or a door left ajar is an open invitation for disaster. A locking pop door, however, creates a secure barrier that keeps these unwanted visitors out, ensuring your chickens sleep soundly at night. But it also helps keep your feathered escape artists in… Some chicken breeds are notorious escape artists. A secure pop door keeps them safely contained within the designated coop area.
Beyond Beasts: Keeping the Elements at Bay
Locking pop doors aren’t just about keeping bad guys out! They also help regulate the environment within your coop. During harsh weather, a locked pop door prevents drafts, rain, and snow from entering, keeping your coop dry and comfortable for your chickens. This is especially important during the winter months when cold and dampness can lead to respiratory problems in chickens.
Looking for the Perfect Coop Door?
Pop doors come in a variety of styles and sizes to fit your coop. Consider factors like ease of installation, durability, and the number of chickens you have. With a little research, you’re sure to find the perfect door style and design to match your taste and to keep your coop secure and your chickens happy.
Peace of Mind for Every Chicken Parent
Ultimately, a locking pop door provides peace of mind. Knowing your chickens are safe from predators and the elements allows you to relax and enjoy the many benefits of backyard chickens. So, if you’re looking for a simple yet effective way to upgrade your coop, then a locking pop door is a clucking good place to start!
Let’s Get Started With My Build
I’ll list all of the components that we’ll need for this pop door and describe how they are cut and assembled in the order that makes the most sense to me.
- The left and right Guides – made from ripping two 2″ x 3″ x 24″ boards in half
- The Door itself – cut from 3/4″plywood
- The Top Plate – cut from 3/4″plywood
- The left & right Wings – cut from1/2″ plywood
- The Disk which needs to be heavy – 1/2″ thick and 2¼” in diameter
- The Bottom Plate – cut from 3/4″plywood
- The Cord – I used plastic-coated wire cable but later switched to a non-coated cable.
- The Cover Plate – cut from a scrap piece of paneling.
The first thing we need to do is determine the size of the door we’ll be using. We like the size of our current pop door opening which is 9″ wide by 12″ tall. Knowing this, and that the two studs I will be putting the door between are 15″ on center (don’t comment, I didn’t build this shed) I’ll be making the door 12″ wide by 24″ tall. I’ll cut that from a scrap of 3/4″ plywood I had lying around. Once cut out, make sure it fits with a little room to spare on either side between the two studs you will be using.
Next up is to cut out our guides. Since the studs of the shed are 2″ x 4″ and my door is 3/4″ thick, I’ll cut two lengths of 2″ x 3″ studs to 24″ and then rip both of them in half on my table saw. This will leave me with four pieces of 2″ x 1 1/2″ @ 24″ long. The first two pieces of 2″ x 1 1/2″ get screwed to the outer side of the left and right stud, sitting on the footer and pressed against the outside wall. Then I’ll sit the door on the footer, centered between the studs and pressed against the first set of guides. Then attach the last two guide pieces to the left and right studs, sandwiching the door but loose enough for it to slide up and down between them.
Holding the door in place, centered in between the guides, use a pencil to trace along the edge of both guides onto the door. This will allow you to see where your guides are when working on the door.
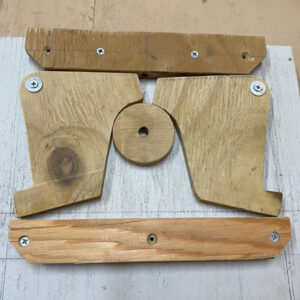
Next, we will need to cut out the top plate which is used as a guide for our cord and a stop plate for the left and right wings to clap against when the door is unlocked. This piece was cut from 3/4″ plywood as I wanted it and the bottom plate to be slightly thicker than the internal locking mechanism. This will allow me to cover the whole thing with a piece of paneling at the end. The top plate was ripped to 2″ and cut to fit between the guides traced onto the door. I also cut the bottom corners to angle in at 45° to help it into the guides when lowering the door. It was then screwed between the guide marks and flush with the top of the door.
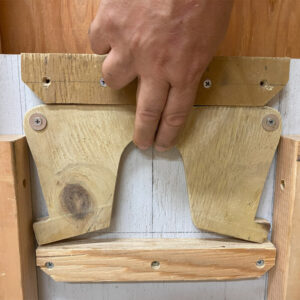
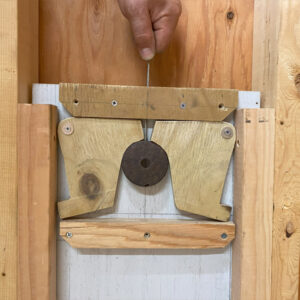
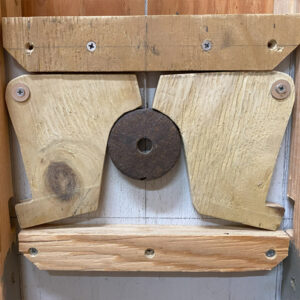
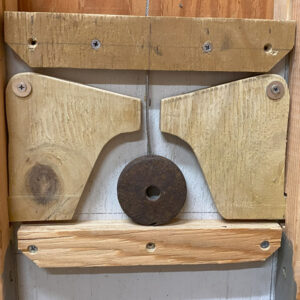
The next two pieces to make will be the locking mechanism – we’ll refer to them as the left and right wings. Their size and design are dictated by the height and width of the door and by the disk that is used to not only unlock but also lift the door open. I have included a FREE TEMPLATE to print and use to get started but keep in mind, you may have to modify the wings to make them work correctly for your application. I jig sawed the wings out of 1/2″ plywood. With the upper corner of the left wing just under the top plate and with the straight edge aligned with the left guide mark, the wing should be pre-drilled making a hole slightly larger than the screw to allow it to swing freely then screwed just tight enough to the door with a washer in either side to help allow it to pivot smoothly. In this position, the locking tab on the wing should be over the guide mark in its lock position. The right wing can now be positioned and attached in the same but mirrored fashion. The distance between the innermost portion of the wings and the top plate should be slightly more than the distance the locking tab is over the guide marks.
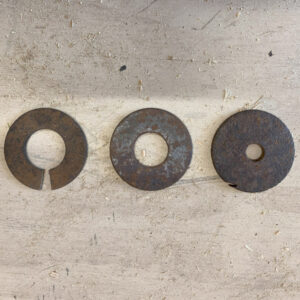
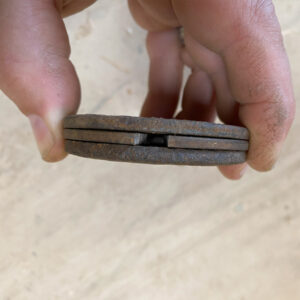
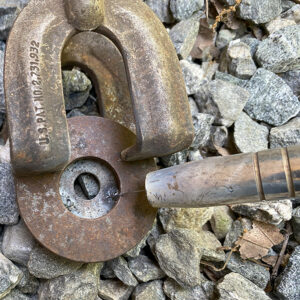
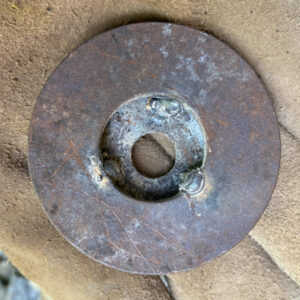
The disk is next. It needs to be 1/2″ thick, 2¼” in diameter and heavy enough to pull the cord back down when the door is in its closed and resting position. I tried cutting one of 1/2″ plywood with a hole saw but the disk wasn’t heavy enough for the length of cord I was using. I ended up making mine from three 2¼” washers I had laying around that I tack welded together. Once you have your disk, you can test the wings on the door by sliding the disk up between the wings. If everything is cut and mounted correctly, the wings should pivot up and the locking tabs should pull inward, within the inner boundaries of the guide marks. If not, you may have to shave a little wood here and there to allow things to pivot correctly.
Once you know everything is working, the bottom plate can be cut and attached. Similar in thickness and shape of the top plate, the bottom plate is positioned between the guide marks and just under the left and right wing. Its job is to prevent the disk from falling too far when the door is closed and to give a bottom mounting point for a cover plate when we are done.
Slide the assembled door into place between the guides and make sure it falls smoothly between them. If it gets hung-up at any point or seems “sticky”, address the issue now before moving forward. This may require sanding or adjusting your guides…
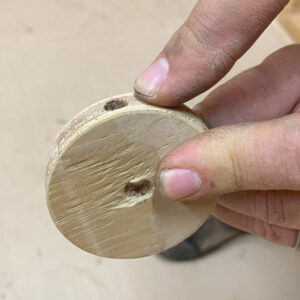
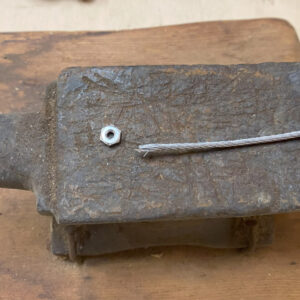
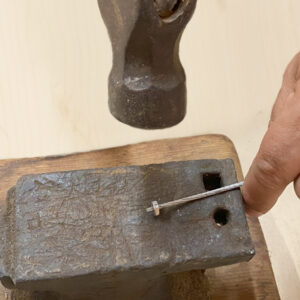
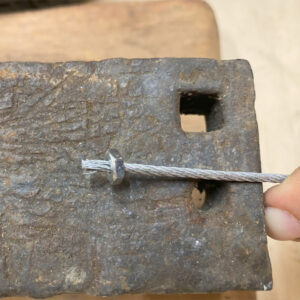
Your disk should have a hole in the middle. If not, drill one at least 1/4″ in diameter before moving on. Next, drill another hole of about 1/4″ from the outside edge of the disk to the center hole. Feed your cable through the outside edge hole and out the center hole. You can either tie a knot or crimp the end of the cable with some kind of a stop. I used a small nut that I crimped on by smashing it with a hammer. Once this is done, pull the cord tight and tuck the stop or knot into the center hole.
Drill a 1/4″ hole through the top plate, from top to bottom at the center point and feed the loose end of your cable up through the bottom and out the top of the top bar. Pull up the slack and see if the disk sits correctly between the wings and can lift the door up between the guides. If the disk spins sideways, just lay it flat and test it again. The cover plate will take care of the disk turning sideways during operation.
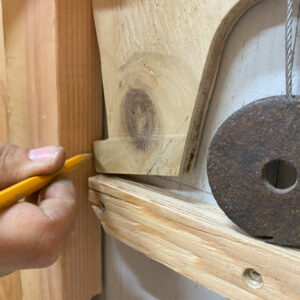
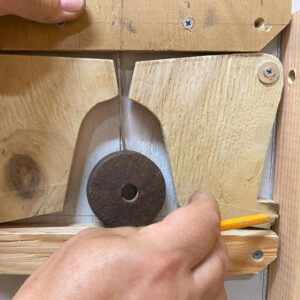
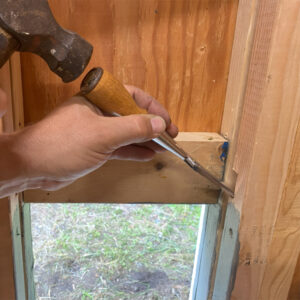
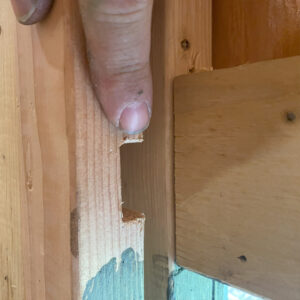
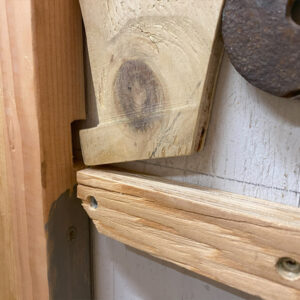
If everything is working as planned so far, we now have to mark where the locking tabs of the wings are touching the outer guides when the door is in the closed position. Mark these points with a pencil, remove the door and chisel your marked locations on the outer guides making sure to go deep enough for the tabs to go fully in. Put your door back and lower it down using the cable. When the door is fully down and the disk is lowered from the wings, they should now pivot down and out with their tabs fully inserted into the holes you just chiseled. If not, adjust those holes and test again. If it looks to be working, you shouldn’t be able to open the door unless you pull the cord up allowing the disk to engage with the wings, unlocking and opening the door.
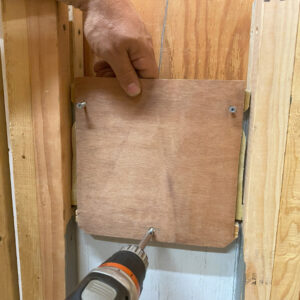
Once everything is working, cut a piece of thin plywood or paneling that is the width of your top and bottom plates and that has a height that spans the top and bottom plate. Screw it to your top and bottom plate to cover the mechanism and keep the disk flat.
Now you just have to figure out what you’ll be doing with your cable. Mine goes up through the header, over a pully and runs along the wallheader to a convenient spot for me to just pull the cable to open the coop pop door. I have a loop at the pull end of the cable that can be put over a small hook after it’s pulled to keep the door open. Then at night, I just unhook the cable and allow the door to slide shut and lock, preventing any unwanted guests from entering the coop at night.
I hope this inspires you to build your own pop door to secure your coop. We have videos showing the other projects connected to revamping our yard shed into a new coop for our chickens available on our YouTube channel. We’d love to hear your comments here or on our videos and thank you for stopping by!


October 1, 2024 @ 5:50 pm
Love this! I’ve been looking to add something like this to my own coop for a while, and if all goes well I’m going to try to integrate a raspberry pi with a DC motor to automatically open/close it at sunrise/sunset. Very well done!
One question: I’m mostly through the build but am having trouble getting the wings to swivel smoothly. I put washers on both sides and am using a normal 1-1/4” wood screw (wings are made of 1/2” plywood) – looked to be what you did in your build as well. Any tips to get it to move more freely?
October 2, 2024 @ 9:55 am
The automation you have planned sounds like a good idea. To get the wings to move smoothly, I drilled holes in the wings that are slightly larger than the screws so that they spin freely. Then the screws are tightened into the door, just tight enough to allow them to swing easily. I hope this helps. Thank you for the question. I have updated the instructions to be more clear.