Building a Simple Bat House & Why
Bats: Your Homestead’s Secret Weapon
Who would have thought that these often-misunderstood creatures could be such valuable allies on your homestead? Let’s dive into the many reasons why a bat house should be a staple on your property.
Natural Pest Control
Many garden and crop pests are on the bat’s menu. By attracting bats to your homestead, you’re providing a natural defense against these unwanted intruders from munching on your crops and invading your living space. This is where bats come in. These winged wonders are voracious insect eaters, consuming thousands of mosquitoes, moths, beetles, and other pesky bugs every night. A single bat can devour hundreds of insects in an hour! Imagine waking up to a bug-free morning, thanks to your hardworking bat colony.
Ecological Benefits
A thriving bat population can significantly boost your crop yields. Bats aren’t just great at pest control; they also play a vital role in the ecosystem. Many bat species are crucial pollinators, helping your fruit trees and gardens thrive. Additionally, some bats disperse seeds, which can help restore natural habitats and create a more diverse ecosystem on your homestead.
A Sustainable Approach
By inviting bats to your homestead, you’re choosing a natural and sustainable pest control method. No harmful chemicals, no expensive traps – just nature doing its thing. Bats produce an abundance of poop and bat guano is a very valuable fertilizer, rich in nitrogen. Plus, you’re contributing to bat conservation, as many bat populations are facing challenges due to habitat loss and disease.
As A Fertilizer Boost
Bat guano is high in nitrogen and potassium, and also contains phosphorus and other micronutrients. These nutrients can enrich soil, promote deep root growth, and enhance plant growth. Their guano also contains live microbes that can help plants absorb nutrients and resist disease and fungi. These microbes can also improve soil health by breaking up heavy soils, improving drainage and texture, and healing sick soil.
Educational Opportunities
A bat house can be a fantastic way to learn about these fascinating creatures. Observe their behavior, teach your children about their importance, and foster a deeper appreciation for nature.
How to Attract Bats to Your Homestead
- Location is key: Choose a sunny spot, preferably facing East, Southeast or South that is near a water source for your bat house. If flying insects are abundant, your bats will be happy.
- Timing matters: Install your bat house in-time for early spring to attract bats before the breeding season, however, any time of the year is better than not getting it done.
- Patience is a virtue: It may take several years for a bat house to become fully colonized, but the colony will grow exponentially every spring.
Let’s Get Started With How I Build A Bat House
I’ll list all of the components that we’ll need for this bat house and describe how they are cut and assembled in the order that makes the most sense to me.
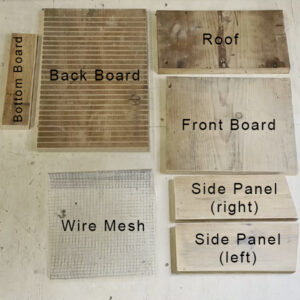
- The Back Board – 14.5″ x 9.25″ cut from 3/4″ pine board
- The Side Panels – 2 @ 10″ x 3.75″ cut from 3/4″ pine board
- The Front Board – 10.75″ x 9″ cut from 3/4″ pine board
- The Roof – 6.5″ x 11.75″ cut from 3/4″ pine board
- The Bottom Board – 2.25″ x 9.25″ cut from 3/4″ pine board
- The Wire Mesh – 9″ x 14″ using 1/4″ mesh hardware cloth
The first thing we need to do is cut the angle for the roof. I did a 10º angle or pitch. The Back Board and Front Board needs this cut across their tops lengthwise and sloping forward. The Roof also needs this cut across the back lengthwise and sloping down, allowing it to sit at the 10º angle but still be flush with the back. And finally, the Side Panels both need to be cut, sloping forward so that the Side Panels are now 10″ x 3.75″ at the back or long end and 9″ x 3.75″ at the front or short end.
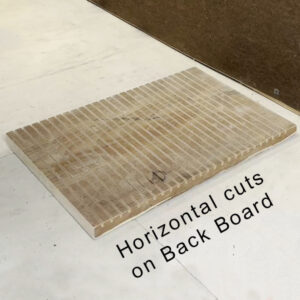
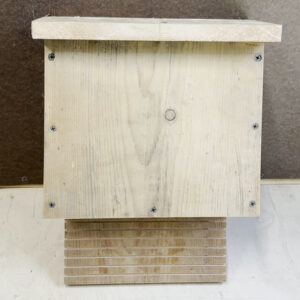
Next, cutting a “ladder” into the Back Board so that the bats can easily land against and climb up into the house can be done by hand, skill saw or table saw. I used a table saw and set my blade depth to 1/4″. I then cut horizontal gouges across the 9″ width of the Back Board, spaced at approximately 1/2″ all the way from top to bottom, similar to a wash board.
Assembly is next and the order is fairly important so that you can attach the Wire Mesh without too much hassle. I say “without too much” because there is really no easy way to do this.
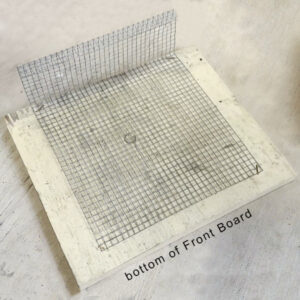
Starting with the Wire Mesh; make a 45º bend 10″ up and then another 45º bend 3″ up from that which should leave about 1″ left. Staple the 9″ x 10″ portion to the inside face of the Front Board so that it is centered from side-to-side and the first 45º bend is flush with the top. There should be an approximate 3/4″ (mesh free) boarder on both sides and at the bottom.
Next, while holding the Front Board over the Back Board so that the 1″ section of Wire Mesh is over the top edge of the back board, staple it in place. You may have to flip the Front Board Over the top of the Back Board and slightly unbend the Wire Mesh to do this but that is okay, as long as the bend for the 1″ section is flush with the top edge of the back board.
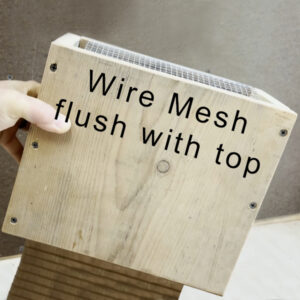
The two Side Panels should now fit snugly on either side of the Back Board with the Top Board sitting on top of them. If everything seems to fit, glue and either nail or screw the Side Panels to the Back Board and do the same, attaching the Front Board to the Side Panels. The Wire Mesh should be exposed but flush across the top of the box where the Roof will go, covering the Wire Mesh.
The next step is to position the Roof so that the angle along the back edge lines up with the Back Board and it should sit centered, tightly sealing across the Back Board, Side Panels and Front Board. If it looks good, glue and either nail or screw it to the Back Board, Side Panels and Front Board.
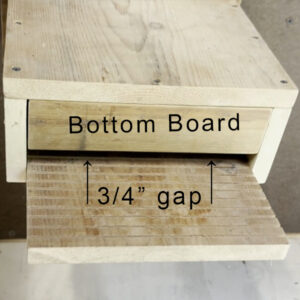
Installing the Bottom Board is easier if you use a scrap piece of 3/4″ board as a spacer. Place the scrap piece in the opening at the bottom of the box so that it is laying against the Back Board and is half in and half out of the box. Fit the Bottom Board in place so that it fills the opening in the bottom but leaves a 3/4″ gap against the Back Board (thanks to the scrap piece). I attached the Bottom Board with three 1.5″ screws – one centered through the Front Board and one through each Side Panel. I didn’t glue this piece into place so that it could easily be removed for cleaning and annual maintenance.
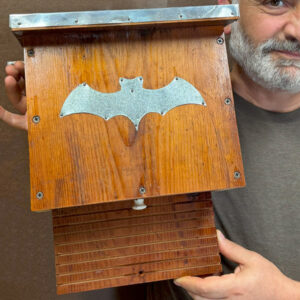
At this point, you bat house is finished. You can add roofing material and stain or paint your bat house to make it last longer and to make it more weather tight. I added a metal roof made from galvanized flashing and I urethaned the box to seal the wood. If you choose to paint, stain or urethane, keep it on the outside only and try to keep the inside of the bat house natural and unfinished. Also, if staining or painting your box, it is recommended that you make it darker if you live in colder climates so that it absorbs more heat, and lighter in warmer climates so that it reflects the heat and keeps the bat house cooler. Another thing to consider is adding backets to the back to allow for easier installation. I put two brackets on the upper back on either side and put one screw through the bottom of the Back Board.
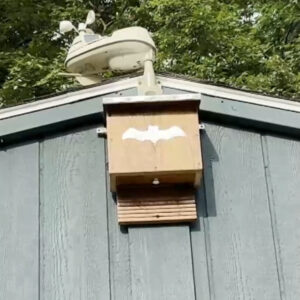
When installing the bat house, try to position it 10′ – 20′ above the ground and facing East, Southeast or South in full sun. Don’t put it in a tree as this will shade it and also allow for certain predators (mainly racoons) to access the bat house and kill / chase away your bat colony. Either mount it high up on a building or mount it to a sturdy pole that doesn’t sway in the wind.
By providing a bat house and creating a bat-friendly environment, you’re taking a significant step towards a more sustainable and pest-free homestead. So, why not give these amazing creatures a chance? You might be surprised at the positive impact they can have on your property.
I hope this inspires you to build your own bat house. We have this and other projects and how-to videos available on our YouTube channel. We’d love to hear your comments here or on our videos and thank you for stopping by!
